OASE BIORB Fish Tank Aquarium Setup Guide
w/ Info on Maintenance, Upgrades & Common Problems
1. Getting Your BiOrb Fish Tank Aquarium Started
You just received your new Oase BiOrb fish tank. Now what? Setting up your BiOrb is actually a simple process if you’re patient and follow these five steps.
NOTE: As the BiOrb is primarily designed as a freshwater fish aquarium, this guide assumes you’re setting up a freshwater fish tank.Step #1 Position Your BiOrb Fish TankWhere should you put your BiOrb Fish Tank? It should be placed close to an electrical outlet and out of direct sunlight. Use either a GFCI outlet or power strip with a built in GFCI. Place your BiOrb on a flat, level surface that can support its full weight. Do not underestimate how much a full BiOrb tank can weigh. The BiOrb Size 105 is easily over 300 pounds when full.
It’s a good idea to leave a couple inches between the aquarium and the wall to route cords and allow access to the back of the aquarium if needed. Remember, once you fill your aquarium with water, moving the aquarium will only be possible if you first drain the tank.
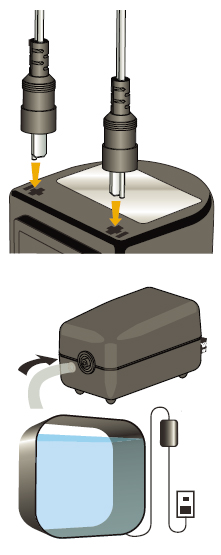
![biorb fish tank pump]() Step #2 The Pump and Filter Cartridge
Step #2 The Pump and Filter CartridgeOnce the aquarium is in place, pull the bubble tube out of the opening in the top of the aquarium. Open the bag containing the BiOrb Service Kit Filter Cartridge and rinse it in your sink with tap water. Place the Cartridge at the bottom of the bubble tube in the center of the aquarium. To do this you will need to remove the bubble tube by twisting counterclockwise and then pulling the tube out of the aquarium. Once the cartridge is in place, you can reverse the process to reinstall the bubble tube.
The BiOrb Filter Service Kit should be replaced monthly. Save money by purchasing a multi-pack, such as the BiOrb Filter Service Kit 12 pack.
The BiOrb Fish Tank Air Pump can be plugged into one of the two connection points on the included power supply. However, make sure the cord leading from the pump to the transformer box has a drip loop. Drip loops should be installed on every single piece of aquarium equipment to ensure the safety of you and your home. To create a drip loop, the cord coming from the pump must dip down below the level of the outlet and then rise back up to the level of the outlet (
see the illustration to the right). The drooping cord ensures that any water that drips down the cord will drip onto the floor rather than enter the outlet where it could lead to an electrical fire.
![biorb fish tank gravel]() Step #3 Gravel and Decorations
Step #3 Gravel and DecorationsBefore filling the tank with water, add the included BiOrb Fish Tank Aquarium Ceramic Media. Rinse the Ceramic Media in tap water to remove any dust and debris that can cause cloudiness. Then gently pour the Media into the aquarium though the top opening. Once the Media is in place you can start adding decorations.
It is recommended you first choose a sculpture or ornament decoration as a centerpiece and then decorate around it. This decoration will also hide the bubble tube in the middle.
Step #4 Add WaterOnce your Ceramic Media and decorations are in place, you can add water to the aquarium. If you are using tap water, please understand it is sterilized with chlorine and chlorine is very toxic to fish. To remove chlorine you will want to add a water conditioner to your aquarium water. Your BiOrb will include water conditioner for initial set up, and each BiOrb Fish Tank Aquarium Filter Service Kit comes with water conditioner. If you want to have more water conditioner on hand to prepare additional water, you can use
Seachem Prime, 100 ml.
Step #5 Time to Plug In The PumpOnce the water is in the aquarium, you can plug in the BiOrb Fish Tank Air Pump and start the water circulation within the aquarium.
After the Air Pump is plugged in the aquarium will be cloudy. This should subside after a couple days. You can turn the light on momentarily to view the aquarium. But in order to prevent algae, do not turn on the light for extended periods of time. Once the process of cycling the aquarium is complete, the light can then be programmed.
2. Cycling Your BiOrb Fish Tank Aquarium
Cycling your BiOrb Aquarium is a critical step. Through the cycling process the natural bio-filter of the aquarium is established. The vast majority of the filtration in a given aquarium is not from the filter but from the living bacteria in the aquarium. The bacteria come from the air, bodies of the fish, and rocks. The bacteria will break down fish and food waste into less toxic compounds so your fish can survive and thrive.
Step #1 Adding BacteriaWhile bacteria will naturally come from the air and rocks you have added to the aquarium, you can speed up the cycle process by adding bacteria to the tank. Your BiOrb Fish Tank Aquarium includes a Biological Booster sachet containing live bacteria. Adding this to the water will help to speed up the cycle process. More of the Biological Booster comes with every BiOrb Filter Service Kit.
Step #2 Adding a food sourceWhen you add your first fish, the fish food and fish waste it produces will serve as a food source for the bacteria. The aquarium can get abnormally dirty during this initial period because the bacteria that will filter the tank later are not fully established. To prevent algae growth during this period, do not turn on the light or add any more fish until your tests show the cycle is complete. See our adding fish section to lean about how to select and add fish.
Step #3 Monitor the CycleDuring the cycling process you will need to monitor the aquarium’s water parameters so you can know where your aquarium is in the cycling process. Testing daily or every other day is sufficient. You should test for ammonia, nitrite, and nitrate each time you test. All these tests and more come with the
Aquarium Pharmaceuticals Freshwater Master Test Kit.
Once your test results show there is no more ammonia and nitrite in the water, the cycle is complete and you can begin preparing to add more fish. The entire cycle process usually takes 3-5 days.
![biorb fish tank cleaner]() Step #4 Preparing for Fish
Step #4 Preparing for FishWhen you finish cycling you will need to perform your first water change. The water change will help to remove the nitrate left over from cycling your tank. About 1/3 of the tank water should be changed initially. Make sure to prepare your water ahead of time just as you did when you initially filled the aquarium.
Before removing the dirty water you should clean the algae off the glass of the aquarium with the cleaning pads that are part of the included BiOrb Filter Service Kit. Then you can remove water from the aquarium by using the BiOrb Fish Tank Aquarium Cleaner Pump. Unplug the air pump and then place the suction tube of the Cleaner Pump in the aquarium. Place the hose end in a bucket and then squeeze the bulb on the Cleaner Pump to start the siphon. Gently push the suction tube into the gravel, removing as much waste as possible. Once you have removed the dirty water from the aquarium, you can pour the new water you prepared into the aquarium and turn on the air pump. At this point you should do your first BiOrb Filter Service Kit cartridge replacement. You should replace the cartridge before you add fish so that your filtration is functioning optimally. Rinse the new filter cartridge just as you did with your original cartridge.
Step #5 Let There Be LightNow that your aquarium is cycled, and the initial extra dirty conditions have passed, you can turn on your light during the day. BiOrbs ship with two kinds of LED lights: the standard LED Lights and the MCR Lights. The
BiOrb MCR Light, Large and the
BiOrb MCR Light, Small can be purchased separately as an upgrade for BiOrbs that include only the standard LED light.
Standard LED LightIf your BiOrb came with a Standard LED light, it can be controlled by flipping the switch in between the light and the power transformer. Leaving the light on for prolonged periods can cause excessive algae growth in the aquarium. Because of this we recommend leaving the lights on for no more than 8-12 hours per day. Keep in mind the aquarium can be on your schedule. Most aquarists prefer to have their lights on in the evening when they are home. Having the lights on from 5 PM to 12 AM is common. With the standard LED light you must remember to turn off the light. Leaving the light on will quickly cause algae issues.
MCR LightingIf your BiOrb Fish Tank Aquarium included an MCR light there will be a remote included which will let you change the color and intensity of the light. The exact color and intensity is a matter of personal preference. Choose whatever looks best with your fish and decorations. Our favorite feature of the MCR light is the ability to set the lights on a timer. You can turn the lights on and have them automatically go to a dim moonlight setting after 8, 10, 12, or 14 hours. We recommend only 12 hours a day max to prevent algae. The timer will allow you to turn the lights on and walk away without having to remember to turn the lights off.
3. Adding Fish to You BiOrb Fish Tank Aquarium
When selecting what kind of fish to add to your aquarium, consider the eventual adult size of the fish as well as the temperament of the fish. Fish that grow excessively large or are extremely aggressive should be avoided. You should also avoid fish with difficult dietary needs and any other hard to satisfy needs. Selecting fish should start before you walk into the fish store. Using the internet or an aquarium guide book can direct you to some species that are well suited for your aquarium.
A quick list of some suitable fish for BiOrbs include: Tetras, Minnows, Barbs, Danios, Cory Catfish, and Kilifish. When selecting fish, make sure to choose them from clean aquariums with no dead or dying fish. Inspect the fish to ensure they’re free of wounds, blemishes or spots. The fish should be eating, plump, and responsive to stimuli. Skinny fish are prone to disease and are likely being bullied by their tank mates. Ask the employees at your local fish store to feed the fish for you and only buy fish that you see eat. It is also a good idea to use the same food that you saw the fish eat.
After you pick out your fish you will need to take it home and acclimate it to your water. When you are transporting your fish try to keep the fish in a dark temperature controlled environment. Bringing a small cooler along is ideal. While a fish can survive in a bag for long periods of time, you want to minimize the stress on the fish by reducing the amount of time that the fish is in the bag. Try to go straight home after purchasing your fish.
Once you have the fish home you can start the acclimation process. Float the fish in the bag on the surface of the aquarium for 15 minutes. This will equalize the temperature between the water in the bag and the water in your aquarium. After the temperature is equal you can open the fish bag and pour the fish with water through a net discarding the water. It is a good practice to never add any water besides your own to your tank since you don’t know what the water contains. Once the fish is in the net you can empty the net into the tank.
Be very careful not to add too many fish too quickly or too many fish in total. No more than three to five fish should be added at a time to an aquarium. Wait at least a week before adding more fish and stop adding fish once the tank becomes too difficult to keep clean or the fish continually fight over territory. A rule of thumb when stocking your BiOrb is 1 inch of fish per gallon. Based on this rule, a 15L (approx. 4G) BiOrb should have no more than four 1 inch fish and a BiOrb 105 (Approx. 24G) no more than twelve 2 inch fish.
4. Regular BiOrb Fish Tank Aquarium Maintenance
To keep your animals healthy and your tank looking good, your BiOrb Fish Tank requires regular maintenance. You need to clean the aquarium, feed the aquarium, and service your equipment. To make sure that you perform regular maintenance it is best to stick to a schedule.
Daily MaintenanceObserve your animals. Make sure that you look at all of your fish to ensure that they’re all eating and responsive.
Fish should be fed on a daily basis.
It’s best to clean the inside of your acrylic tank daily. A great tool for this is using an algae magnet like the
Two Little Fishies NanoMag Magnetic Window Cleaning Device.
NOTE: Be sure to piece a section of the BiOrb Cleaning Pad over the inside part of the NanoMag so it does not scratch the acrylic. Every day you should check the water level in your BiOrb to make sure it’s not too low. Once it has dropped noticeably, top off the tank using conditioned water.
Weekly MaintenanceWater changes should happen at least monthly, but many people prefer doing a small water change every week rather than a large water change every month. If you like adding lots of fish and feeding lots of food, then you may have to do weekly water changes.
When you first start your tank it is very important that you regularly test your water. Testing weekly can let you know where your tank is in the cycling process and it can also alert you to problems before they get out of control. Once the tank is established you should still test weekly for nitrate. We recommend the
Aquarium Pharmaceuticals Freshwater Master Test Kit.
Assuming you have cycled your aquarium properly, you should not need to test for ammonia and nitrite. However, if a fish dies it may be an indication that you have ammonia or nitrite in the aquarium.
Monthly MaintenanceIf you don’t do weekly water changes, you should do water changes at least once a month. Change at least 1/3 of the tanks volume at least once a month. Doing water changes more often than this can help, but changing more than 50% of the water at once can be stressful on your animals.
Replace your BiOrb Filter Service Kit monthly, just as you did before you added fish. A fresh cartridge will be free of debris and have fresh activated carbon to absorb impurities. Clean the top of the aquarium and the light lens. The surfaces of your BiOrb will be splashed because of the water movement in the aquarium. Over time this splashing will form hard water deposits. Hard water deposits form when water splashes on a surface and then evaporates leaving the minerals in the water behind. The result is a crusty calcium build-up on the surface of the aquarium. Clean off this buildup with a damp rag. The most important area to clean is the lens cover of your light. When salt creep builds up on the light cover it will limit the amount of light entering the aquarium and getting to your corals. Cleaning the cover regularly can prevent this.
While some testing should be done weekly, some tests can be done once a month without a problem. Testing pH monthly will make sure you haven’t run into an unusual problem. You might also choose to test water hardness depending on which fish species you have chosen. We recommend the
Aquarium Pharmaceuticals Freshwater Master Test Kit.
Bi-Annual MaintenanceOase recommends you replace the BiOrb Air Stone in the center of your aquarium bubble tube every six months. This is also a good time to clean the bubble tube.
To access the airstone you will need to remove any decoration you have over the bubble tube and then turn the bubble tube counter clockwise to unscrew it from the base. Once the tube is unscrewed you can remove the bubble tube and access the air stone. Simply remove the airstone and put a new one in its place.
While the bubble tube is out of the tank you can clean the tube. You can use a bottle brush and scrub pad for this task but Oase also makes a dedicated Bubble Tube Cleaner that makes this task much easier. Once the tube has been cleaned of any algae build up you can return the bubble tube and center ornament to their original place.
5. Non-BiOrb Products for BiOrb Fish Tank Aquariums
![]() Two Little Fishies NanoMag Magnetic Window Cleaning Device
Two Little Fishies NanoMag Magnetic Window Cleaning DeviceThe best way to clean algae on the inside of you BiOrb is with an algae magnet. The Two Little Fishies' NanoMag is a great choice. It’s just the right size.
However, because BiOrbs are made of acrylic you need to be careful or you’ll scratch the acrylic with the algae magnet. If the surface you are cleaning is flat, this is not an issue. But when cleaning the inside of a rounded surface you will want to cover the magnet. We find the that if you cut off a piece of your Service Kit Cleaning Pad and put it on the inside face of the magnet (inside the tank), your BiOrb will not scratch.
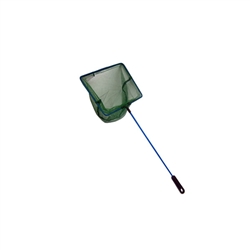
![biorb fish tank setup]() JBJ 3" Coarse Fish Net w/ Plastic Handle
JBJ 3" Coarse Fish Net w/ Plastic HandleYou will need a fish net for putting your fish into your BiOrb, perhaps for removing a fish, and for removing uneaten food. The JBJ 3” Fish Net fits into the small opening at the top of all BiOrbs. 3” X 3.25”. 14” plastic handle.
![]() Aquarium Pharmaceuticals Freshwater Master Test Kit
Aquarium Pharmaceuticals Freshwater Master Test KitDuring the cycling process you will need to monitor the aquarium’s water parameters so you can know where your aquarium is in the cycling process. Testing daily or every other day is sufficient. You should test for ammonia, nitrite, and nitrate each time you test. All these tests and more come with the Aquarium Pharmaceuticals Freshwater Master Test Kit.
After the initial cycling process is completed, you should continue to test ammonia and nitrite weekly and nitrate and pH monthly.
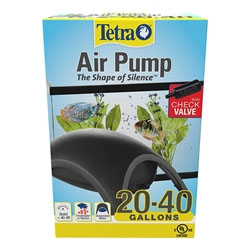
Tetra Air Pump, 20-40 Gallons![biorb fish tank setting up]()
The Air Pump that comes with the BiOrbs may be a bit undersized for the 105L BiOrbs. You might consider upgrading to the Tetra Air Pump, 20-40 Gallons. This Air Pump will be a bit louder, but it will provide more oxygen and beautiful bubbles.
6. Troubleshooting Your BiOrb Fish Tank Aquarium
| PROBLEM | CAUSE | SOLUTION |
| Dirty Water | Service Kit is old.
You need to do a water change. A 30% water change every month is recommended. | BiOrb Filter Service Kit
Do a water change with the BiOrb Cleaner Pump |
| No Air bubbles | Clogged airline Clogged Air Stone | Clean airline. Though not common, the airline could be badly kinked and need to be replaced. Replace the BiOrb Air Stone.
|
| Light Doesn’t Work | The cause could be a non-working light or power supply. With the MCR lights the problem could be the battery. | The cheapest and easiest solution to try is changing the battery in the MCR light remote (if you have an MCR light). Replacing the BiOrb Transformer is the next cheapest choice. Be sure to only replace the transformer with the same type your BiOrb came with. There is a BiOrb Replacement 12V DC Power Supply NEW STYLE and a BiOrb Transformer Replacement, 12V. If the light still does not work, you may need to replace the light. LED lights usually do not last more than 7 years. Contact us for help determining which light to purchase. |
| Air Pump doesn’t work | The cause could be the Air Pump or the Transformer. | BiOrb Air Pump
|
| The Inside of the Bubble Tube is Dirty | This is the normal accumulation of detritus and dissolved organic material. | Two Little Fishies NanoMag Magnetic Window Cleaning Device |
| Fish Get Into the Bubble Tube | Fish are curious. | BiOrb Bubble Tube Guard
|
| BiOrb Too Cold | Some fish require water that is warmer than the ambient air temperature. | BiOrb Tropical Heater Kit
The BiOrb Tropical Heater Kit transforms the BiOrb into a perfect habitat for tropical fish, allowing a wider choice of colorful fish. |
| BiOrb Scratched | As BiOrbs are made of acyrylic, they can scratch. | BiOrb Scratch Remover Polish
Removes fine scratches and restores original appearance to plastics. Includes polish sachet and two scratch removal pads. |
| BiOrb Interior is Dirty | It’s natural for algae to accumulate on the inside of a BiOrb | Two Little Fishies NanoMag Magnetic Window Cleaning Device |
| Water Deposits on the Top Of the BiOrb | Water evaporates and is splashed into the opening of your BiOrb | BiOrb Water Level Guide & Feed Hole Plug
|
Everyone at
MarineAndReef.com wishes you the greatest success with your BiOrb. It may seem like a lot of work, but if you follow this guide, and if you’re patient and organized, you will succeed. The BiOrb Aquariums are a great way to beautify your home, school or office. They’re also a great way for families to connect. If you want your children to understand the ocean, biology, chemistry, and mechanics, aquariums are a great teaching tool.
Feel free to reach out to us with any questions you may have about your BiOrb or other aquariums (480.491.5283 /
[email protected]). We also recommend you take a look at the following sections: Non-BiOrb Products for BiOrbs and BiOrb Troubleshooting. This will give you some idea of what are the next key products for you to purchase for your BiOrb.


 Step #2 The Pump and Filter Cartridge
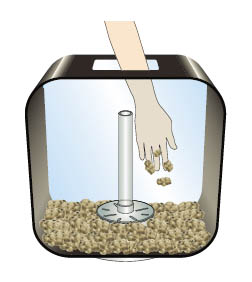 Step #3 Gravel and Decorations
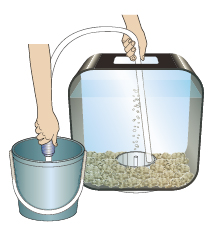 Step #4 Preparing for Fish
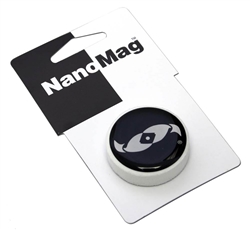
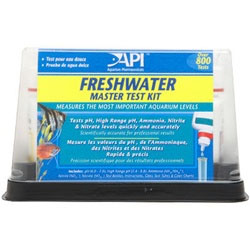 Aquarium Pharmaceuticals Freshwater Master Test Kit