Free Shipping on all orders over $49 • $5.99 Flat Rate Shipping on orders under $49.
Free Shipping on all orders over $49 • $5.99 Flat Rate Shipping on orders under $49.
Free Shipping on all orders over $49 • $5.99 Flat Rate Shipping on orders under $49.

It is a lot easier to glue rocks together to be sure that the rocks are in the exact right position if you can position the rocks in the tank while it is empty. In some cases, you will be moving an established tank that has coral on the rock already, or you may have purchased expensive live rock that will need to stay wet. In most cases, you should be able to aquascape your tank while it is dry. Even if you purchase live rock, only the most expensive live rock is shipped submerged in water. Most live rock is simply wrapped in wet newspaper or towels. In this case, you can keep a spray bottle of saltwater on hand to keep the rock moist, but don’t feel you need to immediately submerge the live rock.
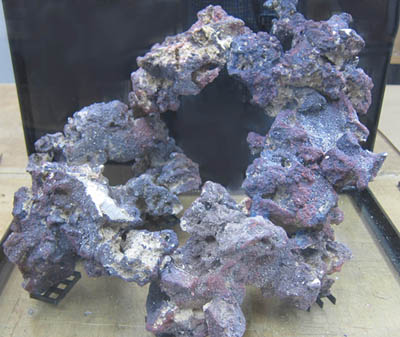
As a practical consideration, do your best to minimize the amount of rock touching the bottom glass. Rock doesn’t float, so you will inevitably have to touch it in some places, but having the rock elevated off the sand will allow water flow below the rock work, which will help to stop detritus from accumulating, and it will create natural caves for fish to hide in.
Many people think that because sand is on the bottom of the tank, it should be added first. In my experience, your rock structure is much more stable if you place the rock directly on top of the solid glass, then pour sand around it to help anchor it in place. If the rock is sitting on sand rather than on the glass, the sand underneath the rock can sometimes shift and cause a mini-avalanche in your tank.
If you are following tip #2, you are trying to minimize the amount of rock that touches the bottom of the tank. Because the rocks are irregularly shaped, it is almost impossible to make a stable platform unless you have three points touching the bottom of the glass. If you are relying on two small rocks to support a larger rock then the structure will tend to rock back and forth. If you are trying to make a flat plane with four or more rocks, then it is very difficult to get all of the points to rest perfectly flat. Try using a tripod structure to lift bigger rocks off the ground. This is the easiest way to get large rocks elevated off the ground and keep the structure stable.
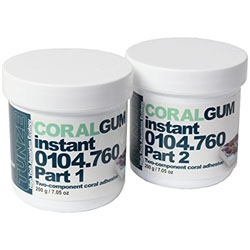
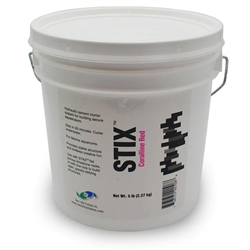
A rookie mistake when aquascaping your first tank is failing to glue the rocks together. Your rockwork might feel stable initially, but once you have large digging and burrowing fish, snails, and urchins that try to shove themselves into every nook and cranny there is bound to be a rockslide that shatters one of your favorite coral colonies. It is best to keep your rocks held together with some kind of adhesive. There are three types of adhesives you can use: glue, epoxy, and cement.
Don’t forget you will need to clean your aquarium. Wiping the glass and vacuuming the substrate are much easier if the rock isn’t right up against the glass. You also want to avoid tucking equipment underneath rocks. This can look good and be fine for a while, but as soon as you need to clean or replace that piece of equipment, you may find it nearly impossible to remove.
Don’t forget that your coral will grow on top of the rocks. A common mistake is to add too much rock, so the tank looks good at first, but once the corals have grown large, the tank looks overly crowded. Make sure to leave open space for fish to swim in and corals to grow. The tank should look a bit empty when you start, because you know it will fill up over time.
If you are like me and don’t have an intuitive design aesthetic, then the rule of thirds is one of the best principles to remember when creating your rockscape. The rule of thirds is a design principle where you draw imaginary lines dividing your tank’s front viewing pane into thirds both horizontally and vertically. The result is an imaginary tic-tac-toe board. The rule of thirds states that where the lines intersect is where you should have your points of emphasis. Putting your most interesting corals or rock structures at these points, rather than directly in the center of the tank, will keep your eye from ignoring the whole tank and focusing only on that one coral.
One thing many people notice after setting up their tank is that the tank that feels very big when empty starts to feel much smaller once you fill it with rocks and corals. In general, incorporating smaller elements will make the tank feel bigger. Using smaller rocks and sand with finer grain will make the tank feel bigger by creating a contrast in size. Using extra-chunky gravel and large, boulder-like rocks will make your tank feel very small. You can also make a tank feel larger by including smaller fish rather than larger ones.
You don’t need to keep the rocks in the same shape they arrived in. Using a hammer and chisel to break down the rocks will help you create a more interesting shape. If you are trying to create a specific shape, it is often easier to cement together smaller rock pieces than to find a perfectly shaped piece. The smaller pieces will also contribute to the previously mentioned sense of scale.
We answer all emails through 3 PM the same day (M-F).
Monday-Friday 9:00 am to 11:00 am & 1:00 pm to 3:00 pm MT. We will return all phone calls through 3 PM the same day.
Note: we do not have daylight savings time in Arizona


.jpg)